Showing posts with label coconut. Show all posts

Monday, June 27, 2016

Frozen Cocktail Pops

Frozen Cocktail Pops

Deliciously boozy cocktail pops will cool you off in no time

When the weather heats up and summer is in full swing, get ready to grab one of these icy, grown-up treats to cool down.
We tested 3 flavours: Coconut Cream Limoncello, Tequila Sunrise, and Gin + Tonic

Ah, summer! I'm a fan, for sure. I love lazing around in my backyard, pretending it's a tropical resort. You can bet I'll be lounging in my oversized sunglasses and maxi dress, clutching a colourful cocktail. And when the temperature rises, a frozen cocktail cools me off perfectly. The fact that it's on a stick is beautifully effortless. 

Frozen pop molds come in all shapes and sizes. The mold I use makes ten pops, using about three cups of liquid. These recipes have been designed to fill my mold; you may need to adjust the amounts to fill your mold. If you have liquid leftover, well consider that your bonus cocktail! Your mold may also have its own sticks, saving you from purchasing extra.

Click for all the recipes...

Saturday, December 10, 2011

12 Days of Christmas Baking! Day 10: Rum Balls

Day 10: Rum Balls


Rum Balls
Based on a recipe by Joyofbaking.com


Ingredients1 1/2 cups toasted nuts, finely chopped (hazelnuts, walnuts, or almonds can be used)
1 1/4 cups finely crushed vanilla wafer cookies
1/2 cup icing sugar
2 tablespoons cocoa powder
2 tablespoons light corn syrup
1/4 cup rum

Toppings
Icing Sugar
Finely chopped nuts (pecans, walnuts, hazelnuts, almonds or pistachios)
Unsweetened Cocoa Powder
Melted Dark Chocolate
Sweetened shredded coconut

Method
  1. Combine chopped nuts & vanilla crumbs in a bowl.
  2. Add icing sugar and cocoa and combine.
  3. Add corn syrup and rum and combine until a nice glistening dough ball is formed. Refrigerate for about an hour.
  4. Using a measured scoop, small spoon or melon baller, scoop out some dough and roll it into a ball, placing the balls on parchment paper-lined baking sheets.
  5. Coat with your favorite coating and enjoy!

Tuesday, December 6, 2011

12 Days of Christmas Baking! Day 6: Coconut Lime Bars

Day 6: Coconut Lime Bars

Lime is one of the scents that evokes the holidays for me. Along with mandarin oranges and clementines, limes were always prevalent in our house for special occasions. One of my favourite cocktails at Christmas is the gin & tonic; with tons of limes, of course!
Put the lime in the coconut! And mix it all up!
These bright and chewy bars have a rich, buttery shortbread crust. The lime centre packs a limey whollop; and the coconut adds a sweet, chewy counterbalance to the acidic limes.

If you like lemon bars, you will love these coconut lime bars.

Coconut Lime Bars 
Makes one 9 x 13 inch tray of bars.
Crust
1-3/4 cups all-purpose flour
1/2 cup light brown sugar, packed
1/4 teaspoon salt
1 cup unsalted butter, cut into cubes

Filling
1-1/2 cups sweetened shredded coconut
2 cups sugar
1/4 cup all-purpose flour
4 eggs
1/2 cup freshly squeezed lime juice (about 4-5 limes)
Zest from one lime
Icing sugar for dusting

Method
  1. Pre-heat oven to 350°F. Line a 9 x 13 inch pan with aluminum foil or parchment paper. 
To make crust
  1. In a food processor, mix together flour, sugar, salt, and butter. Pulse until combined and resembles very coarse crumbs. Pour mixture into the prepared pan and press mixture down with your hand until even. 
  2. Bake bottom layer for about 20 minutes, until edges begin to turn colour. Remove from oven, but leave oven on. 
To make filling
  1. Sprinkle half of the coconut over baked crust. In a food processor, mix together sugar, flour, eggs, lime zest and lime juice until blended. Or whisk together in a small bowl. Pour mixture into pan. Sprinkle remaining coconut over top. 
  2. Bake in oven for 25 to 30 minutes, or until top is set. Cool completely. 
  3. Lift cooled bars out of pan using aluminum foil or parchment paper. Dust bars with icing sugar. Cut into bars.

Sunday, December 4, 2011

12 Days of Christmas Baking! Day 4: Nanaimo Bars

Day 4: Nanaimo Bars

Sweet 'n' creamy 'n' chewy; just like me.
Nanaimo bars, a no-bake layered bar dessert, are quintessentially Canadian and popular hereabouts around Christmas time. If you have insomnia, you can read more about the history of Nanaimo Bars here.

The bars take a lot of ingredients, but they are essentially easy to make. You make the bars in stages, starting with the base. Then, the creamy middle layer is spread over the base. Try not to eat any, I dare you. Finally, melted chocolate is poured over the top. Chill, slice, and inhale.

If these are new to your understanding, please make them and let me know how you liked them! They are a favourite around here, and don't last long.

Nanaimo Bars
Based on a recipe by Deanna Horn
Makes one 9 x 13 inch tray of bars

Ingredients
Base
1 cup butter
1/2 cup granulated sugar
10 tablespoons cocoa powder
1 teaspoon vanilla
2 eggs, lightly beaten
2 cups sweetened shredded coconut
1 cup sliced almonds
1 cup graham cracker crumbs

Middle Layer
1/2 cup butter
4 cups icing sugar, sifted
4 tablespoons vanilla custard powder
6 tablespoons milk

Top Layer
1/2 cup butter
8 oz. bittersweet chocolate, chopped

Method
Prepare Base
In a saucepan on medium heat, melt butter, sugar, cocoa and vanilla together and stir until smooth. Add beaten eggs, stir until combined; remove from heat. Add coconut, almonds and graham cracker crumbs; stir together. Spread mixture onto the bottom of a 9 x 13 inch pan. Refrigerate. 

Prepare middle layer
In a stand mixer, cream butter until light and fluffy. Add icing sugar and custard powder. Cream together until light and fluffy. Add milk, beat on medium high until fluffy. Spread over base layer. Refrigerate.

Prepare top layer Melt chocolate and butter together, mix until smooth. Pour over middle layer and spread evenly to coat. Refrigerate.
Cut into bars and enjoy.

**Edited to fix the instructions for preparing the base. Thanks, all of you who pointed it out!

Thursday, December 1, 2011

12 Days of Christmas Baking! Day 1: Church Windows

Welcome to Let Them Eat Cake's 12 Days of Christmas Baking!

Christmas is coming — don't you smell the chestnuts roasting?

DON'T YOU ?!?

No need to panic. As my Christmas gift to you, I will post a new Christmas baking treat every day for the next 12 days. Coming up: cookies, candies, bars and lots of chocolate! I hope you will find a recipe to share with your family and friends, and become part of your holiday baking repertoire.

My mother loved Christmas. As children, my sister and I would be her helper elves. We would be her baking assistants in the kitchen, cutting and decorating cookies or stirring fudge; we would sit together at the kitchen table making hand-made ornaments for the tree; and she would help us make hand-made gifts for each other. We would listen to Christmas music albums: Bing Crosby and Harry Belafonte crooned while we drank hot cocoa with tiny marshmallows. Some of the ornaments we made still exist and now grace my Christmas tree each December.

We lost our Mom to cancer 18 years ago, but we still continue her traditions as much as we can today. She taught us that the season is about sharing and family and making do with what you have. May you find warm moments of peace and friendship, no matter how hectic and stressful life can get.

Much love,
Lulu

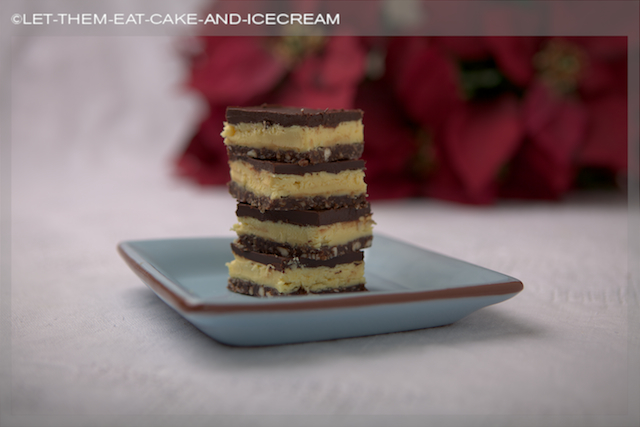
Churchy church windows are churchy. Delicious, without the pesky broken glass and lead poisoning. You're welcome.


Day 1: Church Windows


Chocolatey slices of colorful marshmallows resemble stained-glass windows, and the coating of shredded coconut is reminiscent of a light dusting of Christmas snow. This no-bake slice is one of my favourite Christmas treats, and is something that my Mom, my sister and I would make together every year.

Church Windows
by Barbara Rogalsky

Ingredients
4 oz. semi-sweet chocolate, melted and cooled slightly
2 tablespoons butter
1 egg, beaten lightly
1 cup icing sugar
4 cups miniature coloured (fruit-flavoured) marshmallows
1 teaspoon vanilla
1/3 cup chopped walnuts (optional)
1/2 cup sweetened shredded coconut


Method
  1. Melt chocolate with butter, cool slightly. Mix in beaten egg, stir until combined. Stir in icing sugar and vanilla until combined. Fold in marshmallows and nuts (if using).
  2. Spread mixture on a large piece of parchment or wax paper. Using the wax paper, form mixture into a rolled log about 4" thick. Coat with coconut.
  3. Freeze log for about an hour. Remove from freezer and slice into 1/2" thick slices. Keep church windows in a sealed container and refrigerated. 
Makes about 2 dozen slices.

Special thanks to Lesa, Mimi and Cam for being my kitchen assistants; and to Robin, ÜberHusband, for taking such brilliant photographs and being generally awesome.

Sunday, June 12, 2011

Banana Cake with Chocolate Buttercream and Coconut Custard

Banana cake is such a homey, comforting treat. Baked into loaves and drizzled with sour cream glaze and enjoyed with cafe latte, slices of banana loaf are available at almost every coffee shop for good reason. Baked into a cake pan and topped with rich, chocolate buttercream or cream cheese frosting, banana cake can be sliced into tasty squares and served after lunch. Or made into muffins, delectably studded with dark chocolate chips. The possibilities are endless for this home baked treasure.
Banana Cake hot out of the oven
This banana cake recipe comes from my Mom, who made it in a cake pan with vanilla buttercream for me and my sister to devour as a special after school snack. It had bananas in it, so it was healthy, right?